We’ll start by setting up Apache, one of the most reliable and widely used web servers to host your site. Next, we will install WordPress, the world’s leading content management system, known for its flexibility and ease of use. Finally, we will secure your website with Let’s Encrypt, a free, automatic and open source certificate license, to ensure that your website is secured with HTTPS encryption. By the end of this guide, you’ll have a secure and professional looking WordPress site, ready to go live and provide a secure experience for your visitors. Let’s dive in and start building your own secure WordPress website.
Apache
Install Apache
sudo apt install apache2 -yCheck whether if its up and running
Check service status whether if its in active (running) state
sudo systemctl status apache2You can also check by visiting the below URL, make sure to replace server_ip with localhost or your server ip address
http://<server_ip>You should see “Apache2 Default Page” if it works
Creating Domain
Go to your hosting provider’s website and go to your domain’s DNS records and create an A record giving a suitable Name for your domain and pointing to <server_ip>.
Setting Up Directory
Create website directory. Make sure to replace <domain_name> with your own domain name at all places.
sudo mkdir /var/www/<domain_name>Change owner permissions and set correct permissions
sudo chown -R www-data:www-data /var/www/<domain_name>
sudo chmod -R 755 /var/www/<domain_name>
Create a test file for you to display as the web page
sudo vim /var/www/<domain_name>/index.htmlAnd add the following and save it
<html>
    <head>
        <title>Your Site</title>
    </head>
    <body>
        <h1>Success! Your Site is Working!</h1>
    </body>
</html>
Setting Up Virtual Host File
Create virtual host file at /etc/apache2/sites-available/<domain_name>.conf
sudo vim /etc/apache2/sites-available/<domain_name>.confAnd add the following and save it.
<VirtualHost *:80>
    ServerAdmin webmaster@<domain_name>
    ServerName <domain_name>
    ServerAlias www.<domain_name>
    DocumentRoot /var/www/<domain_name>
    ErrorLog ${APACHE_LOG_DIR}/<domain_name>.error.log
    CustomLog ${APACHE_LOG_DIR}/<domain_name>.access.log combined
</VirtualHost>
Enable Site
Make sure you are in that apache virtual host file directory
sudo a2ensite <domain_name>.confDisable Default Site
sudo a2dissite 000-default.confTest for Configuration Errors
apache2ctl configtestIf there aren’t any errors you should receive the below output
Syntax OKRestart Apache to save the changes you made
sudo systemctl restart apache2Now you should be able to see the below output on your site at http://<domain_name>

Let’s Encrypt
Install Certbot
You’ll need to install Certbot to get SSL certificate with Let’s Encrypt
sudo apt update
sudo apt install certbot python3-certbot-apache
Obtain SSL Certificate
Run the below command to use apache plugin with certbot
sudo certbot --apacheThen you’ll be asked for an email address for renewal purposes
Saving debug log to /var/log/letsencrypt/letsencrypt.log
Enter email address (used for urgent renewal and security notices)
(Enter 'c' to cancel): <your email>
Enter y to agree to their Terms of Services
- - - - - - - - - - - - - - - - - - - - - - - - - - - - - - - - - - - - - - - -
Please read the Terms of Service at
https://letsencrypt.org/documents/LE-SA-v1.4-April-3-2024.pdf. You must agree in
order to register with the ACME server. Do you agree?
- - - - - - - - - - - - - - - - - - - - - - - - - - - - - - - - - - - - - - - -
(Y)es/(N)o: y
Next you can either select y or n to share your email with Electronic Frontier Foundation
- - - - - - - - - - - - - - - - - - - - - - - - - - - - - - - - - - - - - - - -
Would you be willing, once your first certificate is successfully issued, to
share your email address with the Electronic Frontier Foundation, a founding
partner of the Let's Encrypt project and the non-profit organization that
develops Certbot? We'd like to send you email about our work encrypting the web,
EFF news, campaigns, and ways to support digital freedom.
- - - - - - - - - - - - - - - - - - - - - - - - - - - - - - - - - - - - - - - -
(Y)es/(N)o: y
Now you’ll see the list of domain names, select the numbers of the domain names which you need to activate HTTPS for and Enter
Account registered.

Which names would you like to activate HTTPS for?
We recommend selecting either all domains, or all domains in a VirtualHost/server block.
- - - - - - - - - - - - - - - - - - - - - - - - - - - - - - - - - - - - - - - -
1: <domain_name>
2: www.<domain_name>
- - - - - - - - - - - - - - - - - - - - - - - - - - - - - - - - - - - - - - - -
Select the appropriate numbers separated by commas and/or spaces, or leave input
blank to select all options shown (Enter 'c' to cancel): 1,2
And then it’ll activate and issue Lets Encrypt certificate for your domains
Requesting a certificate for <domain_name> and www.<domain_name>

Successfully received certificate.
Certificate is saved at: /etc/letsencrypt/live/<domain_name>/fullchain.pem
Key is saved at:         /etc/letsencrypt/live/<domain_name>/privkey.pem
This certificate expires on 2025-02-17.
These files will be updated when the certificate renews.
Certbot has set up a scheduled task to automatically renew this certificate in the background.

Deploying certificate
Successfully deployed certificate for <domain_name> to /etc/apache2/sites-available/<domain_name>-le-ssl.conf
Successfully deployed certificate for www.<domain_name> to /etc/apache2/sites-available/<domain_name>-le-ssl.conf
Congratulations! You have successfully enabled HTTPS on https://<domain_name> and https://www.<domain_name>

- - - - - - - - - - - - - - - - - - - - - - - - - - - - - - - - - - - - - - - -
If you like Certbot, please consider supporting our work by:
 * Donating to ISRG / Let's Encrypt:   https://letsencrypt.org/donate
 * Donating to EFF:                    https://eff.org/donate-le
- - - - - - - - - - - - - - - - - - - - - - - - - - - - - - - - - - - - - - - -
If everything went as it should be, you must be able to access your domain with https://<domain_name>
WordPress
MySQL Configurations
First of all we’ll start by installing mysql server and client and also needed php packages
sudo apt install mysql-server mysql-client php php-mysql -yRun the below command to secure our database engine
sudo mysql_secure_installationMySQL will connect using blank password by default and select if you want the VALIDATE PASSWORD component or not
Securing the MySQL server deployment.

Connecting to MySQL using a blank password.

VALIDATE PASSWORD COMPONENT can be used to test passwords
and improve security. It checks the strength of password
and allows the users to set only those passwords which are
secure enough. Would you like to setup VALIDATE PASSWORD component?

Press y|Y for Yes, any other key for No: n
Select whether to remove anonymous users or not
Skipping password set for root as authentication with auth_socket is used by default.
If you would like to use password authentication instead, this can be done with the "ALTER_USER" command.
See https://dev.mysql.com/doc/refman/8.0/en/alter-user.html#alter-user-password-management for more information.

By default, a MySQL installation has an anonymous user,
allowing anyone to log into MySQL without having to have
a user account created for them. This is intended only for
testing, and to make the installation go a bit smoother.
You should remove them before moving into a production
environment.

Remove anonymous users? (Press y|Y for Yes, any other key for No) : y
Select whether to disallow root login remotely or not
Success.


Normally, root should only be allowed to connect from
'localhost'. This ensures that someone cannot guess at
the root password from the network.

Disallow root login remotely? (Press y|Y for Yes, any other key for No) : y
Select to whether to remove test database and access of it or not
Success.

By default, MySQL comes with a database named 'test' that
anyone can access. This is also intended only for testing,
and should be removed before moving into a production
environment.


Remove test database and access to it? (Press y|Y for Yes, any other key for No) : y
Select whether to reload privilege tables or not
 - Dropping test database...
Success.

 - Removing privileges on test database...
Success.

Reloading the privilege tables will ensure that all changes
made so far will take effect immediately.

Reload privilege tables now? (Press y|Y for Yes, any other key for No) : y
And then that step would be All Done!
Now lets login to MySQL and run some queries
sudo mysqlCreate Database for wordpress
CREATE DATABASE wordpress_db;Now create a user on that database replacing your_password with your password
CREATE USER 'wp_user'@'localhost' IDENTIFIED BY 'your_password';Next grant all privileges for that user on the database we created
GRANT ALL PRIVILEGES ON wordpress_db.* TO 'wp_user'@'localhost';Now run the following to exit
FLUSH PRIVILEGES;
exit;
Run the below commands to download and extract the wordpress package on our website directory
wget -P /tmp https://wordpress.org/latest.tar.gz
sudo tar -xzvf /tmp/latest.tar.gz -C /var/www/<domain_name>
Change the ownership and permission of the wordpress folder
sudo chown -R www-data:www-data /var/www/<domain_name>/wordpress
sudo chmod -R 755 /var/www/<domain_name>/wordpress
Now your should see WordPress installation wizard on https://<domain_name>/wordpress
WordPress Installation
Select preferred language

Click Let’s Go to configure wp-login.php file

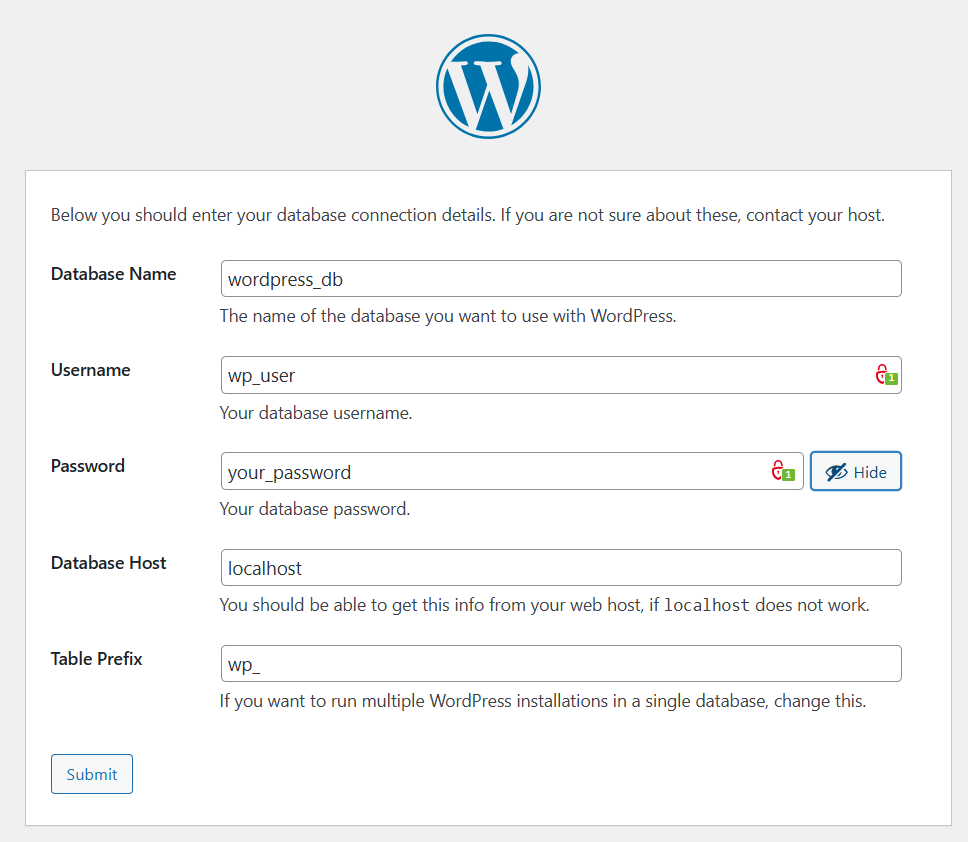
Fill the fields with relevant records you configured in MySQL earlier

You should see the below output if everything is correct, now click Run the installation to proceed to next step

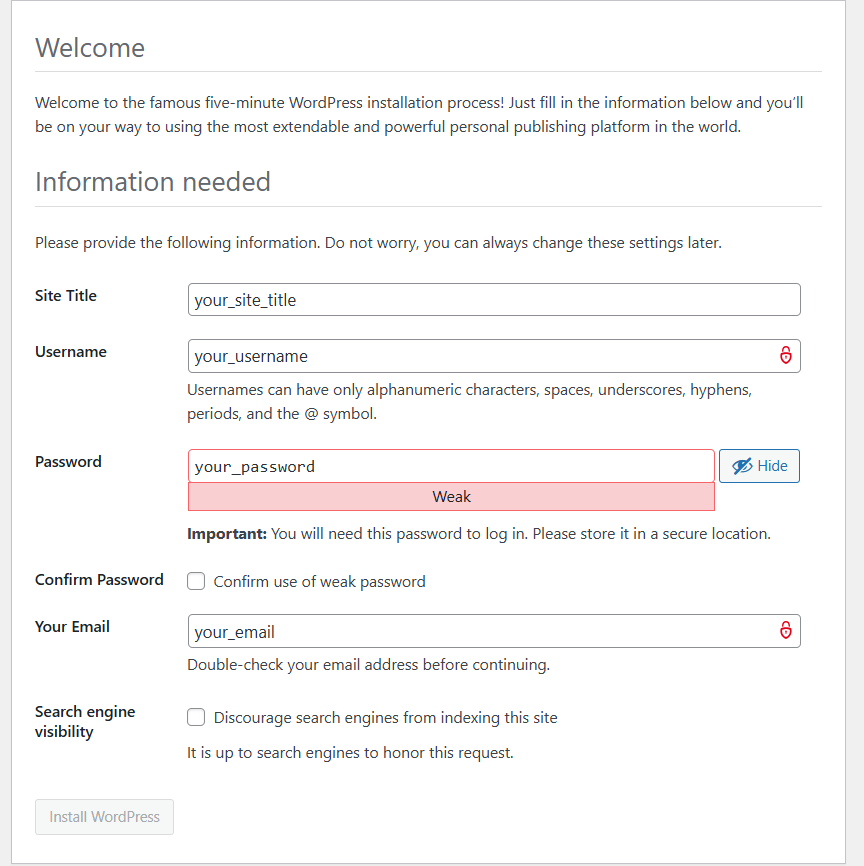
Fill the relevant fields as per your requirements, remember to save the Username and Password and click Install WordPres

Proceed to the Log in page by clicking Log In

Log In with the credentials you gave earlier

You should see the following Dashboard if the credentials are correct

And yeah that sums up our tutorial, hope you followed along till the end. Explore your dashboard and enjoy!
We value your input. Share your thoughts or ask questions by leaving a comment down below.


