With the world being as connected as it is today, protecting your online activity has never been more crucial. Pritunl is an open-source VPN server for creating your own virtual private network (VPN), a gateway for a group of people to access your VPN. Pritunl helps you with this by creating a seamless workflow that protects sensitive data, ensures privacy, or enables remote access. In this article, we will outline the steps needed to set up a basic Pritunl VPN server and client on Ubuntu to ensure and making it easier to secure your network.
Downloading & Configuring Server
Download Pritunl
Run the following commands to install pritunl.
sudo tee /etc/apt/sources.list.d/mongodb-org.list << EOF
deb [ signed-by=/usr/share/keyrings/mongodb-server-8.0.gpg ] https://repo.mongodb.org/apt/ubuntu noble/mongodb-org/8.0 multiverse
EOF
sudo tee /etc/apt/sources.list.d/openvpn.list << EOF
deb [ signed-by=/usr/share/keyrings/openvpn-repo.gpg ] https://build.openvpn.net/debian/openvpn/stable noble main
EOF
sudo tee /etc/apt/sources.list.d/pritunl.list << EOF
deb [ signed-by=/usr/share/keyrings/pritunl.gpg ] https://repo.pritunl.com/stable/apt noble main
EOF
sudo apt --assume-yes install gnupg
curl -fsSL https://www.mongodb.org/static/pgp/server-8.0.asc | sudo gpg -o /usr/share/keyrings/mongodb-server-8.0.gpg --dearmor --yes
curl -fsSL https://swupdate.openvpn.net/repos/repo-public.gpg | sudo gpg -o /usr/share/keyrings/openvpn-repo.gpg --dearmor --yes
curl -fsSL https://raw.githubusercontent.com/pritunl/pgp/master/pritunl_repo_pub.asc | sudo gpg -o /usr/share/keyrings/pritunl.gpg --dearmor --yes
sudo apt update
sudo apt --assume-yes install pritunl openvpn mongodb-org wireguard wireguard-tools
sudo ufw disable
sudo systemctl start pritunl mongod
sudo systemctl enable pritunl mongod
After the installation finished, database setup prompt will be shown at http://<public_ip> as below.
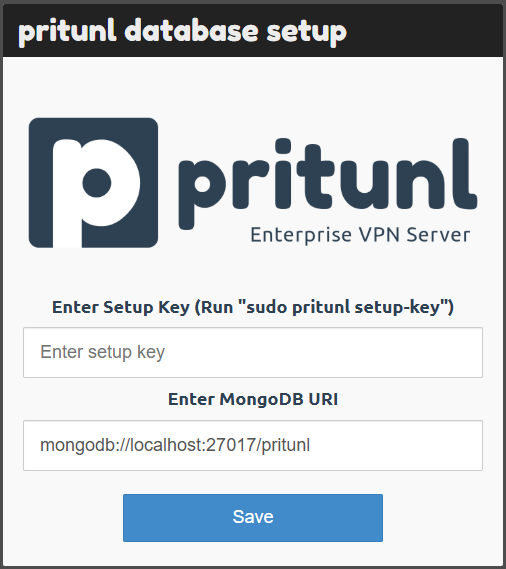
Initial Setup
Run the following command to obtain Setup Key and then paste on the web prompt and click Save.
sudo pritunl setup-key
Then you’ll be prompted to login and now run the below command to get the default username & password and enter it on web and click Sign in.
sudo pritunl default-password
Then you’ll be prompted to Initial Setup dialog, there you’ll be able to change your password and Save, Now you’ve successfully logged into pritunl web portal.
Configuring portal
Adding organization
- Click Add organization from the Users page on web and provide a name to the organization and click Add.
Adding Users
- To add Users to the organization click Add User, enter a suitable Name > Select organization you created earlier > enter an email(optional) > enter PIN for the user and click Add and the user would’ve been added.
Creating Server
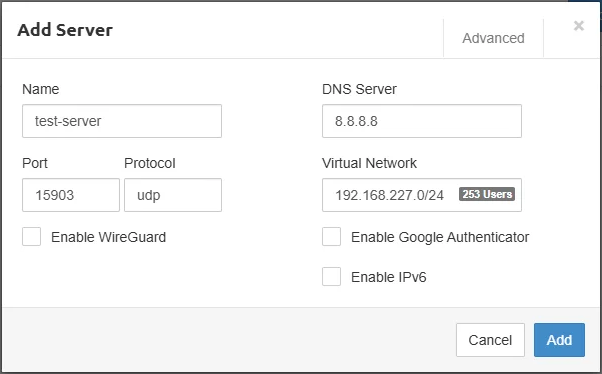
Enter Name for the server, for Port & Protocol random UDP will be selected you can proceed with it or change it as of your preference, but you’ll have to allow this port on inbound rules of security group, for Virtual Network give a network address that won’t conflict with local network on client computer and large enough for all the users that will be attached to server or else leave it as default and Click Add. Now click Start Server.
And then click Attach Organization to attach the organization to the server by selecting the particular organization and Server and Click Attach.
Adding Route
- And then Click Add Route and give the IPv4 CIDR of VPN’s VPC to Network, Select your Server and Click Attach.
- Remove 0.0.0.0/0 route from server so that our traffic will be fully routed through VPN server.
Connecting to VPN
- Download Pritunl Client app for your OS and install.
- Download user’s profile from the Users page on Pritunl web and import it to Pritunl Client App.
- And then connect by clicking Connect and provide the PIN you created for the user and then you’ll be connected to VPN.
Now add the <Private_IP>/32 of your VPN server for the source of SSH Port(22) in security group of each server in your VPC to access them through VPN.
We value your input. Share your thoughts or ask questions by leaving a comment.